Time for the latest update and again I have found myself 3 weeks in arrears, not a problem as it turns out. Issue 35 introduces us to some metal work (brass etching). I found it odd they have given us some P/E (photo-etch) now rather than complete the hull, but on looking over what is left to do on the hull it does make sense as the quarterdeck planks right up, which means we need to finish part of the deck below the shelter deck.
I've done my own thing on some of the brass work so don't think you have to follow, it works for me but it may not work for you. I want to find the easiest way to do certain jobs so making bespoke tools for the job is for me part of the hobby. You'll also notice I've changed the way the pictures look, I think it works well, I can get more in and it look good as well. As I write this update I've received Issue 38, more P/E and moving further towards the bow of the ship, it also uses parts from Issue 35 (doors), bit of bending this time.
(top left) laying the bow part in place but not glueing yet. (top right) marking up where that layer of planking starts (bottom left) I decided not to follow the instruction..again..but to plank it my way, which was simply to step it. (bottom right) at the other end (stern) the planking stop short for now, I just made a small jig to make sure it was a clean end to the planking.
(top left) some sanding of the hull, I intend to sand more when we finish the hull planking (top left) a close up of how I finished the second planking at the stern. (bottom left) just a nice shot:) (bottom right) we still need the final bow section, come on Hatchette..where is it, just overlayed to see how much more is left on the hull.
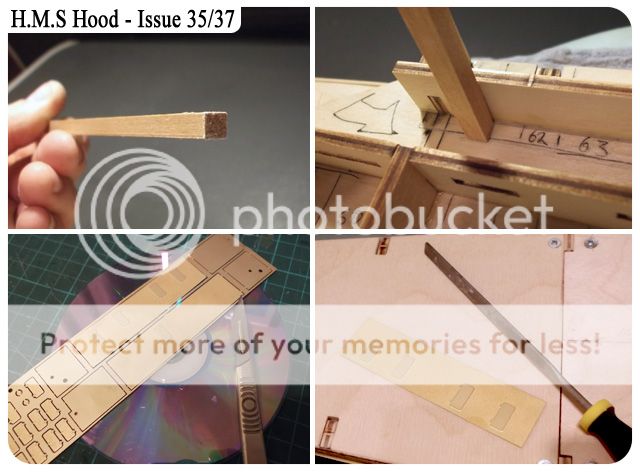
(top left) I bought these bending pliers solely for P/E, they cost me near on £20, but I think a worthy addition, there are cheaper ones on the market. (top left) Our first P/E for HMS Hood. (bottom right & left) Preparations begin, some bespoke tools made for sanding the area where the P/E will sit, just a light sand to make sure no glue has got stuck to it.
(top left & right) Another simple tool made from scrap wood and a small square of sand paper, again making sure there is no glue that could prevent the P/E from sitting flat on both surfaces. (bottom left) I used a CD to cut the P/E away from the fret, I guess you can use pretty much anything as long as it isn't your cutting mat as it will probably bend the metal while you cut. (bottom right) once you taken it from the fret all I did was to carefully file the edges to make sure it was smooth.
(top left & right) I also had some sanding sealant that was bought for my HMS Victory (another model to do) to simply seal the area I am covering with the P/E (bottom left) turning the P/E over I used some fine grade wet & dry paper to get a good base for gluing, nothing to hard, just a light sand. (bottom right) before I added the doors I wanted to check it layed flat against the wood and found a method that worked for me to hold in place once i add the glue.
(top left & right) Issue 36 & 37, both starboard and port P/E (bottom left) Once again find your method of cutting the brass work from the fret and stick to it. (bottom right) and again I used wet & dry on both side to key the glue and to also prepare for painting at a later stage.
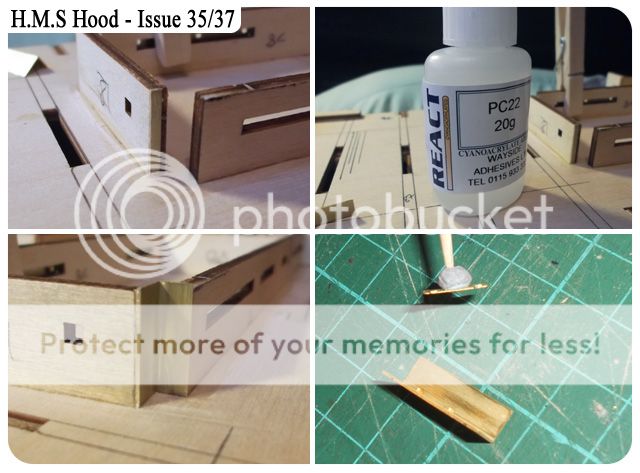
(top left & right) my first P/E bend with the new tool, works well (bottom left) dry fitting these parts first to make sure they fit well against the wooden parts, seems ok on that side. (bottom right) on the other hand this side isn't fitting well, it's worth keeping the off cuts of your P/E frets.
(top left) I've kept all of the off cuts from the brass frets, and using these I've managed to build it gap out a little. (top left) a good eBay deal for some gel super glue, lets see how this work, if I doesn't work well then I'll find another glue. (bottom left) that worked well, your model maybe different so don't assume there is a gap. (bottom right) I didn't add the door with this corner part until it was dry fitted and any gaps sorted, then the wet & dry treatment on both side. I used a cocktail stick with some blue tack attached to the end, the door was picked up by the blue tack and placed in position after glue was applied onto the corner part first..worked well for me.
(top left & right) the finished section with door, and from above as well. (bottom left) attached the doors with the 'blue tack cocktail stick' method. (bottom right) all glued into position, now to work on the side parts.
(top left & right) I have decided that the magazine instruction good as they are don't really help you out when they ask you to attach something that WILL get knocked off many time during the finishing of the hull, so I have covered that here by making an addition from scrap's of fret from previous issue. (bottom left & right) the new part in place with some wood behind to make sure it holds its position firm, then a light sand to follow the contour of the deck, oh and don't forget to drill the port hole.

(top left & right) the same applies on the other side, the picture do really speak for themselves, if they don't get knocked then fine but if they do then by spending an extra few hours to strengthen the P/E is time well spent. (bottom left) if that piece of wood wasn't there then how easy would it be to knock it off? (bottom right) this part seems OK to me, I don't see too many things catching it..I have some picture by the way of what that small porthole circle shape that we had to glue on actually is....the ship's emblem.

Now this is what I'm sure will split some people, remember this is my ship:) I wanted to start trying a method of reproducing the porthole eyebrows, I've searched all my books and other referance's for any pictures of the area we are now working on, I found sod all! so with that lack of information in mind I decided to go ahead and reproduce these now and find a good method as I'm sure we will need to add them ourselves, so by getting some wire and a suitable drill bit, I wrapped the wire around and cut the resulting circle in half. I then pencilled the area on the P/E and with the trusted cocktail stick and a very small amount of glue (using the 'freebie' magnifying glass) spread the glue following the pencil line, then carefully dragged the half circle just below the porthole. I've still a few more to do but I'm more than happy with the result.
That's is for now, I still need to complete the above P/E porthole eyebrows but I do think I have found a method that works for me, if you have another way then please post a comment.


Hi Colin,
ReplyDeleteI have been waiting for this post with baited breath :) and as ever you give us more great photography ! With some very clear close ups, I crank my screen up to full magnification for a really close look .
If you don’t mind me “bugging” you I have a few questions.
BFN Kim.
Thanks Kim, hope the picture's aren't too small for you but I had to decided how I was going to do it with all the possible pictures I had. Fire away with your questions.
ReplyDeleteHi Colin, The new pic layout works just fine for me and you have been able to add more detail.
ReplyDeleteWhat are these "eyebrows" ?
BFN.
Hi Colin, I have been following your site/blog every since you started it and have found your hints/tips very useful, especially as this is my first partwork model! As I am mainly a plastic ship kit guy I (who uses WEM products for detailing) I have found some useful tools aimed at the photo-etch market the Mission Models Etch Mate 3C is great for getting the bends perfect (it will set you back about £30 if I remember correctly). Another is the Brass Assist Rolling Set (about £60).
ReplyDeleteFor Anonymous the "eyebrows" are designed to drain water away from the scuttles (portholes to non-naval types).
Two very good sources of pictures/information on HMS Hood are; The Battlecruiser Hood by John Roberts and The Battlecruiser HMS Hood by Bruce Taylor both available on eBay or Amazon.
Kind Regards and keep up the excellent work.
Russ
23 and a half years in the Royal Navy
Hi Russ !
DeleteThanks for your input, much appreciated, like you this is my first build and I am finding that sometimes it's more than just building a model.
BFN, a non navel type ! a land lover :)
Thanks again for positive comment:) Kim, as Russ has explained they are otherwise known as 'Rigol' The rim or 'eyebrow' above a port-hole or scuttle. I'm not 100% sure they were on the porthole on this level of the ship but as mentioned I decided to add them in any case. There are a few other methods of making these and hopefully I can get a chance to have a go this weekend (grandchildren allowing). Russ, yes I've seen those on the market but I don't really want to spend that sort of money just yet, as for those books..yes well worth getting, Ive had them for some time and use them all the time, also try and get Clydebank Battlecruisers, Forgotten Photographs from John Brown’s Shipyard, just a superb book with some amazing early Hood picture, real close up.
ReplyDeletecheers
Colin
Hi Colin, Thanks again for your explanation, I see now the “eyebrows” on a ship do the same job in a way that eyebrows did on a lot of post 1700s brick houses And also to show off the skills of the brick makers.
ReplyDeleteDon’t talk to me about Grandchildren ! :) I have 3 Granddaughters
(oldest is 26) you just got to love em :).
I have thought about the eyebrows and I have come up an idea that could or may be would produce uniform eyebrows, but I am hesitant to explaining my way in front of such knowledgeable craft builders.
How do I become something other than anonymous ? I don’t really understand that bit.
BFN. Kim
Kim, All,
ReplyDeleteThere is no such thing as a dumb question - only a dumb answer; believe me after 23 plus years in the RN! Hence the following question - what type of adhesive do you use to bond PE to wood? Do you use PVA wood adhesive? I will carry on using Cyanoacrolate (Super Glue) to bond brass to brass as it has work for quite a few years fo me so far.
I would also refer you back to me previous post that stated that I have never done a part work model before hence the no dumb question statement!
Happy building my friends.
Russ
Hi Russ, well for me I coated the wood first with sanding sealant then used the super glue (gel) on the back of the P/E, it worked for me.
ReplyDeleteHi Russ,
ReplyDeletePVA (Poly Vinyl acetate) will not stick any non porous materials such as P/E to wood, however it will in a diluted (with water) form does make an excellent sealer for wood and other porous materials, so with Collins advice about pre sanding, sealing then super glue we are on to a keeper.
What are your views on the “eye brows” ?
Just finished watching the pageant, as an “old salt” what did you think of it ?
BFN Kim.
Hi Kim, that pageant was bloody brilliant!!! hope everyone else enjoyed it, I'll tell you this if they ever release a model of the 'Gloriana' I'll be having that, what a wonderfully British boat.
ReplyDeleteHi Colin.
ReplyDeleteHave to agree with you 100%, what vessel ! the ornate attention to detail was spectacular and what a challenge it would be to model builders, but I have to say that I felt so sorry for the people who designed those amazing thrones ! when her Mag and hubby did not sit on them for a second.
Looking forward the concert tonight !
BFN Kim.
P.S. I was on the look out for eye brows but not a sniff, LOL.
good information shared!!!
ReplyDeleteColin,
ReplyDeleteDo you already know when you will finish your hull from the ship?
Because I want to follow your way of building and advice?
Builder