Another 2 week update and I'm fully up-to date with the Issues, I'm hoping this weeks wont be too late due to the long bank holiday.
I've finished the porthole 'eyebrows' and I really happy with them, you wont see that much but at least it works.
There's a fair bit of bending to do this week so taking your time and dry fitting again is the way to go. Also make sure you prepare not only the brass for gluing but the wood that is taking the P/E.
I've been working on a plan of this deck area and the other items we are likely to get before the roof goes on. I'll spend a few more week on it before posting the plan here but you can expect to add various size's of Hawser reel's (some of which are on Issue 39's fret), A few hatches, deck lockers and ventilation trucks, some may not come in the magazine but are there, so some scratching to do.
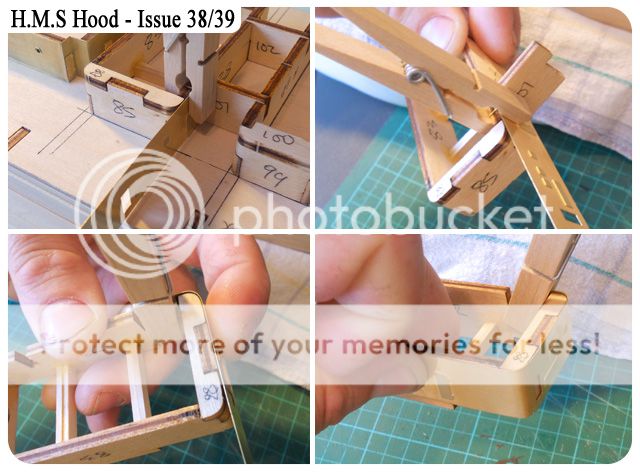
(top left) I mentioned this a few weeks ago, if you remember adding that little disc to the first set of P/E we got on both starboard and port? well it seems its the ships emblem, this picture and a few other show it clearly (how's you painting) (top right) Another jig made for bending the wire to make the porthole 'eyebrows' or 'scuttles' (bottom) it does take time but I think the results speak for themselves, hope they wont fill in when I paint (airbrush) this area.
(top left) a method of attaching the long brass to the wood, don't have anything that will mark the brass, here I'm using wooden peg's and a strip of wood at the base with the heavier clip holding the wood rather than the brass. (top right & bottom left) full set of 'eyebrows' (bottom right) my 'first mistake' I added the door's with the hinges the wrong way around, thinking the magazine got it wrong..nope!!! I got it wrong, I've taken the doors off and done it correct.
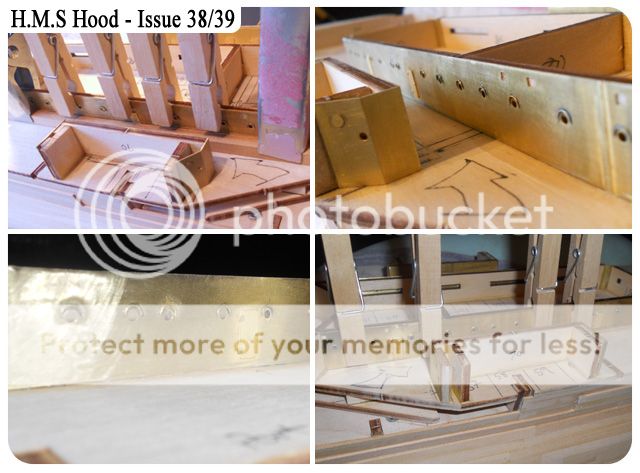
(top left) Issue 38's P/E brass fret, time for some bending. (top right) As I originally decided NOT to glue these parts to the main ship I can work with them so much better, but first I sealed them (as shown in last months Issues) a bit smelly so open your windows or like me you wife will shout 'what's that stink' (bottom left) Once again I didn't follow the magazines steps but decided I wanted to complete the end of this section first, nothing to hard here. (bottom right) Ha..the doors now put on the correct way.
(top left) I was mulling over the best way for me to bend this brass, I decided on simply bending around the wood, I know, I've seen other ways of bending P/E with a drill bit and a mouse mat, maybe to much for this job? a good idea but for me I stuck with this. I started by butting the brass up-to part '101' and holding it there with a peg and making sure it was flush to the deck. (top right) After taking the whole section away from the main ship I could comfortably start to gentle bend the brass around the wood. (bottom left & right) The bend in progress and gently putting pressure with my finger I could grab the other side and pull the brass to form the bend. I used my P/E pliers to help form the bend once I've taken it away from the wood.

(top left) Nothing glued here just held in place with pegs but still holing a good shape already. (top right) Issue 39 parts, some parts are held over for future issues. (bottom left) All parts were taken from the fret and cleaned, the reverse was also 'keyed' sanded gently with some 'wet & dry'. (bottom right) more parts dry fitted and held in place.
(top left) I wanted to add more pressure to this part as it was smaller and needed more help with bending. (top right) Gentle pressure while bending, I then took it away and added more bend using the pliers. (bottom left) Checking the angle is good. (bottom right) Once again all dry fitted brass, all holding itself nicely.
(top left) prior to glueing, checking all parts are correct and prepared, I number the backs just to be sure nothing went wrong. (top right) A couple of pegs, stripe of wood and a clamp makes short work. (bottom left & right) The finished section, both front and back.
(top left) A small section just laid in before gluing. (top right) I was glad I didn't glue this lot as it would be pretty tricky otherwise. (bottom left & right) All glued, doors added.
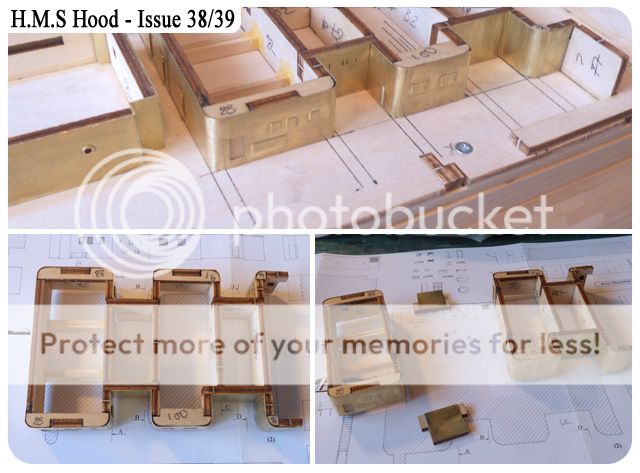
(top) Notice some areas here for adding other items in the future, hopefully lockers ect. (bottom left & right) The whole section taken away, as more parts are released I can simple work away from the ship and take it apart until it's ready to be under-coated and painted..then glued into place.
(top left & right) A comparison shot showing how close we are to positions of other items. (bottom) The Hawser reels still on the brass fret and also on the plans.
Hawser - A description
Hawser Reel. A heavy reel for the stowage of hawsers when not in use. In its simplest form it consists of a cylindrical body on which the hawser is wound. At each end a disc shaped guard is fitted to keep the hawser in place. Hawser reels are sometimes mounted on frames and fitted with friction brakes with which to control the paying out of the rope.
Hawser. A large rope, either fiber or wire, used for warping, towing, mooring, etc.


Excellent work, I’ll put this way of working in my brains.
ReplyDeleteHi Colin,
ReplyDeleteAnother very informative with great graphics posting ! Looking at the eyebrows in position as it were I have to say they look fine, nice idea and your bending looks spot on.
In terms of preparing the P/E prior to painting I stumbled across another aid to this process that I think will help, you may well know the tool ? it’s called a fibreglass abrasive pencil from a company called Ecobra, the tool is used mainly in electrical jobs such as circuit boards and electrical points cleaning but I have tried it and it is very good for prepping P/E especially for detailed (around doors ect.) and small parts, it cost me £6.50 and it came with a loaded pen and 5 refill nibs which I think will be enough to complete our project ! So it won’t break the bank :) I simply cut the nib on the oblique to suit my pen holding style and away I went ! What do you think ?
You have mentioned air brushing, that interests me very much ! Do you think the P/E will be primed Prior to the final finish ?
BFN. Kim
P.S. thanks for including explanation about the Hawsers very helpful.
Hi Kim, thanks for your continued support here, regarding the pen Ive not seen or heard about them, but I guess if it works then go for it, for me I'm using as you've seen the old fashioned 'wet & dry' stuff.
ReplyDeleteAs for airbrushing, I will be using it on the whole model, first I intend to use a grey primmer (halfords) in thin coats, until I can source the correct colour for the main finish. The area we're working on now will have to be painted before the decking goes down, which could be sometime. I do however have a deck arrangements plan I'm working on for the quarterdeck to cover parts Hatchette may not supply.
How far are you with your model Kim?
Thanks again
Colin
Hi Colin,
ReplyDeleteI have not started my build proper if you like, I have to rely on help to get my hobby room ready for using but I have done a lot of prep work so when I’m up and running it will be full ahead both !
Picked up issue 40, some P/E and cotton thread ! I never thought I’d have to sew my own sailors suit :)
There are some nice pics of the Hood in it though.
Hi, Im taking a guess the thread will be for the Hawser Reels, cant see what else.
ReplyDeleteColin
Hi Colin,
ReplyDeleteWould you know what kind of handles the doors have ?
Kim.
Hi Kim, "for' andles"? ha sorry just my humour, erm Kim well it's a water tight door and will have about 10 pull handles around the door to lock and seal. Look on page 115 of the 'Anatomy' book, it will also have a standard pull handle on both side.
ReplyDeleteColin
Hi Colin
ReplyDeleteI have only just started building the Hood which is just started selling in New Zealand. We are up to week 5 so I have a long way to go to catch up. But reading your posts is extremely interesting and is helping me get ideas.
A quick question onthe brass plating would it be easier to solder the joints with a low powered soldering iron or is the sheeting to thin.
Cheers,
Errol
Hi Errol, good to hear your doing 'the hood' in New Zealand. I'm glad your using my diary to help, regarding the brass..I woud'nt soldier the joints, they are quite thin and you would have to file down the edges after soldiering, glueing is good enough, beside your going to run into problems when the area gets a little tight to poke a soldiering iron in:)
ReplyDeleteColin
Hi Colin,
ReplyDeleteThe late great Ronnie barker ! f u n e m n x ?, a sad loss to the comedy world. I'm "watching open all hours" (again) on gold at the moment.
I've written to Ronnie Corbett to ask him if he would be interested in taking guided tours around my build of the hood, he has not answered me yet :)
Catch you later.
Kim.
Hi Colin, the Anatomy book ?
ReplyDeleteKim.
Kim, I would consider a must have book - Anatomy Of The Ship is everyhting you need to know about how she was built, it includes so many great line drawings to guide you on this build.
ReplyDeletego here - http://www.amazon.co.uk/Anatomy-Ship-HMS-Hood/dp/085177900X/ref=sr_1_1?s=books&ie=UTF8&qid=1339956899&sr=1-1
Hi Colin,
DeleteThanks for the heads up there, I've just ordered a copy today.
Kim