Things are starting to get serious now, these next 4 issues have parts that I have decided to hold off for a while, at least until I know what and how they join to the main hull. I have also decided to make some serious adjustments to the 'railings', have a look at you own peril.
It seems Hatchette don't follow logic with this build, not a problem as I/we still seem to be enjoying it but it would be nice to finish some areas first.
HMS Hood has hit the news in 2012 it seems, there is talk of bringing the ships bell up and putting it a museum..good I say, those sailors who died need a memorial.
Daily Mail story
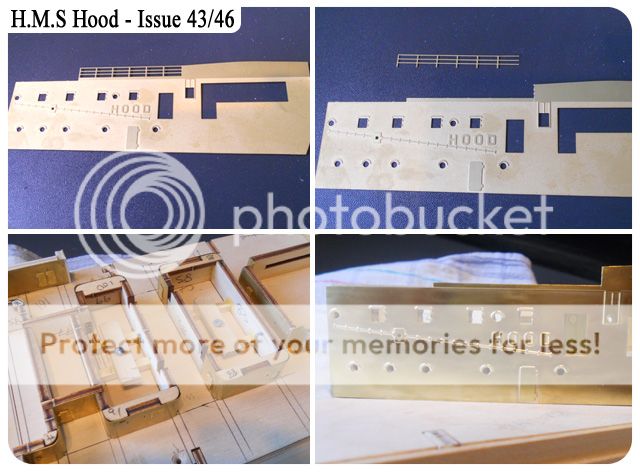
(top left & right) I've added some 'litho plate' to the wooded areas as I felt the paint looks far better on aluminium than wood. (bottom left) again with 'litho plate' the corners look neater. (bottom right) The first wall-covering for the quarterdeck which included the name, there is something missing here both on the port and starboard side wall covering..I'll add this at a later date.
(top left & right) Something that was bugging me was after laying the P/E part 183 it seemed not to join up well with the already fixing part as shown by the arrow, I was really concerned that something had gone wrong..(bottom left & right) I had an epiphany...:) I bent the already fixed wall piece and everything fitted.
(top left) Once dry fitting part 184 there were some port holes that needed drilling out and some that needed opening up a little more, I think it looks much better. (top right) I marked with a pencil and drilled and filled the porthole. (bottom left & right) 'Butcher time', I thought long and hard about this one, but I know I've made the right choice, having the railing on the wall part now is just asking for trouble. I have carefully cut them off and stored them but I will be making my own railing...more of that later.
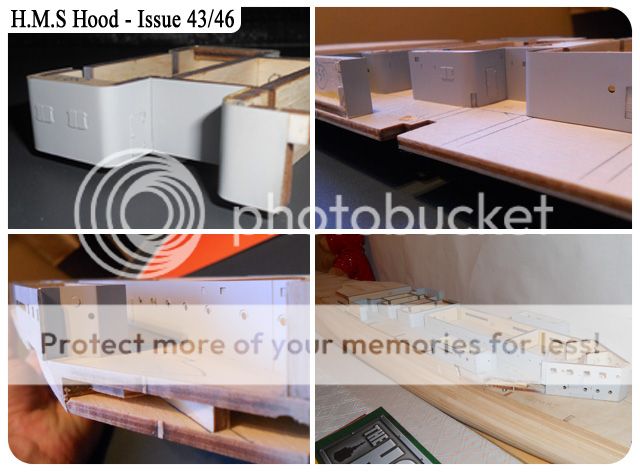
(top left & right) again cutting the railing from the wall covering, do you feel brave? :) (bottom left) As I've not glued these section's to the deck I wanted them secured a little more, so as you can see just a few bits of wood and some screws..all done. (bottom right) The side wall prepared for some undercoating, but not glued into place yet.
(top left) This larger piece is the front of the quarterdeck, we should really be doing this soon. (top right) another wall piece ready for attacking! (bottom left) I simply cut gently with the blade and used the Tamiya P/E pliers to take the railings off. (bottom right) Some deck sections primed.
(top left) After again trying the Halfords paint I gave up, I couldn't get the paint thinned well enough so I opted for some Vallejo grey primer, straight from the pot to the airbrush, mush better. (top right) You can see Ive not added the Hawser's yet, I wont until they are complete, I can not see how on earth they expect people to add the rods and cotton to the Hawsers while they are attached to the walls. (bottom left) I think this primmer really lays well on the P/E, I did clean the bare P/E before spraying, but beware that what ever you clean it with some fibres may still stay of the P/E, this happened to me, I used a cotton bud...I wont be again..lesson learned.
There are areas that I'll be holding off for a while but I will be starting the big guns soon.


Hi Colin,
ReplyDeleteBeen a while since i've had the chance to post but been keeping a weather eye out on your progress - good job. I was a little surprised by your comment on Halfords primer; i use it on 1/350 p/e without any snags. with the cleaning i generally just wash in mild detergent and rinse with fresh water then pat dry with a linen tea towel/air dry.
Regards
Russ
Hi Russ, are you talking about the primer in the tin rather than from the can? what did you use to thin it down? I'm sure its OK but I couldn't get it to work..maybe I'm doing something wrong.
Deletethanks again
Colin
Colin,
DeleteI just use the aerosol spray can as it is. It produces a very fine coating which seems to work fine for me. I've used it for years although generally on armoured vehicles but quite a few ship modellers use it so i tried and been using it ever since (long time now).
Russ
Hi Russ, I decided not to use the aerosol and really wanted to get some airbrush time under my belt, hence going for the Halfords tined primmer. It didn't thin down that well for me so I moved onto Vallejo primer.
DeleteCheers
Colin
Beautiful update Colin. I was looking at your blog again over the weekend while I've been laying down my brass work.
ReplyDeleteI noticed the same issue with part 183 when I was test fitting the ply, and have done the same steps as you, but I haven't taken any photos of it. (My update isn't done yet, won't do it until I finish all my gluing and cleaning up.. hopefully by the weekend).
The only criticism I have is that I miss your larger photos! I don't enjoy your "four small pics in one" as it doesn't show as much as what your older pictures do! :p But it's your build, your update, and I will just sit back and still admire what you're doing, hoping the entire time mine looks half as good as yours! :)
Cheers,
Logan
Hi Logan, I think taking time to drill out the portholes are well worth the effort as the effect is so much better. I'l be looking forward to you pictures over at the forum:)
DeleteI was wondering what people thought...4 pictures as you say does give me more options but effects the close up pictures that I know can help a lot.
Let me work on something to meet halfway..thanks for the feedback Logan.
cheers
Colin
Actually I've been meaning to ask, what did you use to clean your brass work?
ReplyDeleteA dremmel attachment..I'll take a picture of what I do with the brass work on my next update.
DeleteCheers
Colin
Hi Colin
ReplyDeleteBeen following your build since I started building the Hood only up to week 10 down here in NZ. But I must say you have been an inspiration to me and am guessing to all other builders that are following your build.
I agree the railings are a bit strange and when I get to this stage I wont be using thes at all. I have built a few models mainly Billings Boats and they supply various Rail Stanchion which I will use with some .5m copper wire and if done properly it looks great. Cant wait to get to the stage your at but I guess being so far down under thigs are slow.
Cheers
Errol
Hi Colin,
ReplyDeleteYes It’s me again ! As always a great and informative posting, but I think I may ask you too many questions so I’ll ease off a bit.
As for the critics of your “ 4 pic “ postings as I said before I think they are fine, now I wouldn’t want to teach my grandma to “suck eggs” but if I want to take a closer look at your pics I just press and hold “ctrl“ on my keyboard then tap on the “ + “ key to increase the size of the image and then “ - “ key to decrease the size of image, the more taps the larger the image and vice versa, frankly if that’s not close enough how have they managed to get as far as they have ? :)
Not poking fun guy’s, just (hopefully) a piece of advice.
Catch you later,
Mob.
Hello Kim,
DeleteI'm more than aware that you can use crtl+ to change your browser resolution. :) However this just zooms in, and will show a pixelated image, compared to Colin's older singular pictures which were at a higher resolution.
As someone who likes to detail their progress as they go along with imagery, I personally feel images tell the entire story. I'm sure you've seen my build of the Hood around, as I've noticed you comment previously about other builds and their images.
Feel free to show us yours please!
And again Colin, you don't need to change how you do your updates, I still quite enjoy the way they are. :)
Looking forward to your use of your metal gun barrels to replace the pathetic plastic offerings!
Hi Jinnai,
DeleteI am sorry, I did not mean to ruffle anybodies feathers here it was a genuine offer of advise, you have to excuse me this is my first build so I'm green behind the ears so to speak :) I would love to view your build, because the more advise the better for me ! please tell me how I can view your progress so far.
I can't show you my build yet because I have not started it, I have to rely on other people for help to help me make a work surface as I am disabled.
I look forward hearing from you again.
Cheers KIM.
Hi Kim,
DeleteIt's ok! You're not ruffling anyone's feathers here. :)
There is quite a large bunch of us posting our builds over at the Partworks Model Forum, where Colin posts also under the forum handle "zeptrader". Mine is under my handle here, Jinnai.
Here is the link to all the build diaries.
http://www.partworkmodels.co.uk/phpBB3/viewforum.php?f=94
Make sure you have a cup of tea or coffee ready, there's loads of information there to take in and can take quite a while to read through! :)
Cheers, Logan.
Hi Logan,
DeleteMany thanks for your reply, I'm going to look at the part works models site as soon as I get the time, thanks for the heads up on the cuppa :) I will certainly take your advise !
Hope to chat again.
Kim.
Hi Colin,
ReplyDeleteHave I said something to offend you ?
You have not answered my last 2 postings.
Regards MOB (Kim)
Hi Kim, just been busy with work and home, not had much time to respond.
DeleteCheers
Colin
Hi Colin,
ReplyDeleteUnderstood :)
Catch you later !!
Kim.