Now up-to 30% built?.... doesn't seem it.
3 issues here are supplied with more P/E, wooden parts and parts to be used later..more of that later.
As well as following the magazines instruction Ive side stepped a few things and added my own parts and ideas, not essential but as you will see some parts that are glued to the hull (P/E) could knock very easy, I've covered the possibility only. I've also considered the painting, the deck we are working on is being added all the time and I think it would be wise to consider painting at least some areas. A visit to Halfords and some test painting follows....

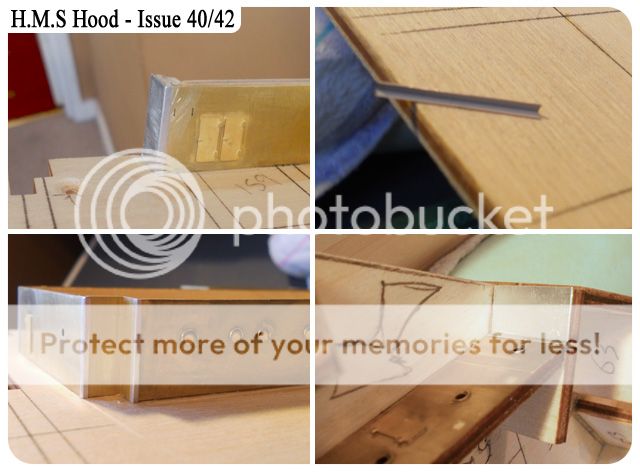
(top left) Issue 40 has some thread, this will be for (famous last words) the Hawser reels, I cant imagine they would supply any rigging thread at this early stage. (top right) as always take the parts from the fret and prepare, here I've used the right angle to get the correct shape. (bottom left) Dry fitted against the wood work show a potential problem with this P/E getting knocked, if your careful then you'll probably be OK, I don't want to risk it. (bottom right) I've measured and cut some scrap wood to add to the area that we are adding the P/E to, to at least give it some strength.
(top left) both sides have the extra wood added, before gluing I checked the measurements of the wood before gluing. (top right) I've added more glue to this side to give it more strength. (bottom left) Here you can see the P/E laid across, the side piece needs adding. (bottom right) side piece attached and glued.
(top left) On checking the plans for this area I see a port hole (shown by red arrow), as I've put a lump of wood there I need to adjust this. (top right) another plan shows where the port hole will be. (bottom left) a quick measurement and cut the area that will be covered by P/E and hopefully have a port hole here. (bottom right) area finished to cover the port hole.
(top left & right) final attachment that included the doors of the P/E, to be honest a lot of this wont be seen, but as we all know...'we will know what's there' (bottom left & right) after the final smaller piece added (162), it could do with some filler on the edges.
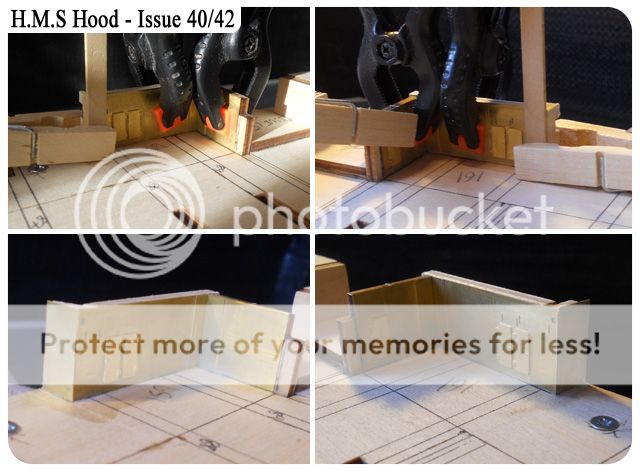
(top left) I seem to be referring to the plan more and more so I decided to 'stick it on the wall' (top right) Issue 41 contains 4 wooden 'spacer' parts plus some P/E that will be used later. Pretty simple task of gluing 'em together. (bottom left & right) hopefully you can see the angle that I have these
pieces, they need to be at this angle, not flat. The instructions are very vague once again but you need to sand these parts to match the angle of the hull/deck 62.
Parts supplied in Issue 42, the wood is obvious really but the rod? my guess again the Hawser Reels.
(top left & right) before gluing anything the sanding has to be done, the angle can be seen here, always offer up the part to be added here (166) and add the whole deck back on the hull to see how it looks. (bottom left & right) nothing is glued here but just laid over, this at least gives you an idea of what needs to be achieved.
(top left) as mentioned earlier on about filling the gaps, I decided (artistic licence) that filler/putty would be far to messy, instead as an 'ex' litho printer I have loads of metal plates, these are very thin and fold very easy. this picture show exactly my concerns about things getting knocked...I did knock the original part and tried to re-bend it back to shape, not very good. After measuring the metal plat was cut with the added lip to fold around the corner..this looks far better and cleaner than putty (IMHO) (top right) with this in mind I cut some corner sections out of the metal plate, this plate is very very thin and can bend easy..but if you have loads of it then take your time. (bottom left) the result, clean and crisp, not 'historic'? yep! but who will even ask that question once the roof's been added, personally I think it works brilliantly. (bottom right) with some ideas flowing I decided to cover the wood still showing with more metal plate, once it's painted and parts 165 are added you will never know, also the paint adheres to the plate better than bare wood.

(top left) talking of paint, I think it was time to get serious about paint, as more and more parts are being added to the decking it will become hard to gain access to paint, I thought of the idea of getting the Halfords spray cans and 'decant' the paint but they had the Grey Primer in a tin, far cleaner to use this and just thin it out, the same can be said for the Red Oxide primer, my personal choice to the lower hull. (top right) I also picked up some Cellulose Thinner's in Halfords and as shown here I already had some Zero paints Airbrush Cleaner, I'll use this only for cleaning the parts to be painted.
(bottom left) After some thought I decided to go down the White Ensign Colourcoats paints route, you can see some excellent information regarding this on the HMS Association web site link here - Paint Schemes 1920 - 1941 As I'm sure we are all making the 1941 model the paint to use is AP507B (WEM code: RN02) I had a conversation with John Snyder of WEM (USA) he advised me on 8 tins for a 1:200 scale model, along with 3 tins of AP507A for the steel decks (WEM code: RN01) it was suggested a Cellulose thinners would be fine. The total cost for the WEM Colourcoats was just over £25. I have decided not to buy the WEM anti-fouling red as I think the Halfords primer is just as good..at least for my needs.
(bottom right) I wanted to test not only my Airbrush (bought 2 years ago) but the primers of a few different surfaces. Split into 2 sections, one for grey and one for red primer. After these have dried I intend to test the WEM paints over the primer. The various material I've used are from left to right in the picture - the magazine supplied P/E, thin plasticard, metal litho plate, and 2 various thickness of off cut wood from the magazine (these where sealed prior to painting).

(top left) Using the Airbrush Cleaner and an ear bud I just carefully cleaned the scrap P/E. (top right) Using a syringe measure what you think you'll need into a mixing pot. (bottom left) adding the thinners again make a mental note of what you have used, this was all a quick test for me but x3 of primer out of the tin to 4 thinners, it was still a little thick, your after a 'milky' constancy. (bottom right) As with anything airbrushing you will need to do lots of thin coats, don't be tempted to spray too much on to quick. I did the same mix for the grey primer.

(top left) just to give you an idea of the equipment I'm using, the compressor is a Piston-type oil-less compressor, with a max psi of 87 (that's what it says on the box) there are 2 switches, one for constantly on and the other that stop when the cylinder is full. (top right) My airbrush is a Spraymaster ABR 1005, and I'm really happy with it, the nozzle supplied is 0.3mm plus it has 3 different sizes cups (2cc, 5cc and 13cc) (bottom left & right) Ive only shown 3 materials after spraying with the thinned primmer as this will be the most common material to be painted. The wood was covered OK but not brilliant, it still looks like wood.
(top) the Red Oxide Halfords primer sprayed onto P/E, I rubbed it to see how far it would go before it came away from the P/E, it took some time and after this small test I'm convinced the paint and thinners work well.
(bottom) I intend to test the WEM paints over both the red and grey primer, at least to see how different the grey primer is compared to AP507B, and to find out if AP507B changes its shade if sprayed over the red oxide primer.
As a footnote I have bought and changed my 0.3mm nozzle & needle for a 0.5mm nozzle & needle, I've yet to test spray, but I'm sure it will be fine.
I do have Issue 43 and 44 but will be holding for a while to decided how I will approach the 'stupid' railings that have been supplied with the P/E panel, I am amazed at this early stage they do things like that.


Hi Colin,
ReplyDeleteA very informative posting with some great pics, things are getting serious LOL, painting ! I see you have all the air brush and compressor kit something to think about.
I brought the book you suggested, good advice but how did blow up the plan from 1/400 to 1/200 ?
Loads more questions but for now I'll say ttfn. Kim (MOB)
Thanks Kim, I bought the airbrush kit about 2 years ago when I was working on some Tamiya F1 cars, still haven't got around to them. Regarding the plans, I went to a copy/print shop that can enlarge and print onto large format sheets and asked them to them blow it up to 100%. Ask away Kim:)
ReplyDeletecheers
Colin
Hi Colin,
ReplyDeleteIt's been awhile since I last chatted with you m8 (model-space) good to see that you've gotten on well with the hood. I'm only up to issue 12 my self any-way just throught I'd say hello,
Ed,
(model space - Eddieboy)
Hi Colin,
ReplyDeleteI have noticed over a couple other sites I've been browsing (not just "blowing smoke" yours is the best in terms of photography)and I have seen what I call a pin punch, are they any good and wouldn't it mark the beach wood ? I'm looking into buying a small power tool it seems to me that Dremel come out on top, would you concur? you are right about finishing off the corners with the angle piece's it is much neater, what would you suggest could be used in place of printing plate ?
TTFN, Kim.
Hi Kim, those 'pin punch' or 'pin pushers' are OK, I had one while I was doing the planking on HMS Victory, there OK at starting the pin/nail then finish with a small toffee hammer, just don't push all the way down with the 'pusher' you could slip and wham! straight through your planking.
DeleteI've had my dremmel for years and would never buy anything else, just superb, plenty of power but it has the ability to slow it down via a slide switch.. variable speed. But if your going to use small drill bits then you'll need another (smaller chuck) BUT if you go that small then maybe just an archimedean hand drill. Yes the corners do look better, I know they are not quite as per original Hood, but its internal and once painted you wont see them. If you having a search in your local area you may find a small local printers, give em a call and ask for old used plates from small offset machines...OR...I bought some years ago those pot plant copper things, not sure what there called but you can write on them and stick them in the plant so you know what's growing..I think I got them from Wilkinson.
does that help Kim
Cheers
Colin
Hi Ed, thanks for having a look around, dont be a stranger eh!
ReplyDeletecheers
Colin
Hi Colin,
ReplyDeleteThanks again for your words wisdom, I’ll leave the pin punch I think, slowly slowly “catchy monkey”
I have just picked up 43,44 and 45, I don’t know if you have seen them yet but I thought painting was getting serious ! There some very small pieces of E/P how on earth do you get them off the fret, let alone
glue them in place, there are “railings” that are so fine they have made me think twice about sailing
her some of the parts are as fine as human hair that would be so easy to damage, some heavy duty magnifying is required here I think luckily I have an “angle poise” type magnifying spot lamp
(£24.99 Argos) it’s a bit crude but with a bit of TLC it does the job.
A couple of things have been puzzling me, when painting parts that have port holes the port holes
them selves will inevitably get painted in, do you intend to pick them out afterwards ?
I love old b/w British films of all subjects I conceder them to be social history even or more so the
War time ones, in the battle ship to battle ship or the battle ship to air movies why do the “gunners”
Pom poms ect, on the English battle ships wear white hood type head covers ? What was the purpose ?
seems to me that they make a good target just like in older battles when the English soldiers wore a red tunic with white webbing forming an excellent white cross on there backs !! Hit here !
Well if you have not fell asleep by now Colin I look forward to your next post
TTFN Kim.
The white hoods are anti-flash protection. It saves the skin from burns due to any explosions.
ReplyDelete